Hey! I recorded a video course!
If you like this article, you will also like the course! Check it out here!
We used the Elixir + Phoenix stack to deliver scalable, fault-tolerant and high-availability IoT solutions to the customers of my first employer. The web frontends, we build for managing these solutions, need to be developed rapidly and adjusted constantly to the needs of our customers. The Phoenix framework is a perfect choice for our needs, but unfortunately requires us to add interactivity using JavaScript. That changed when the Phoenix LiveView project came along.
With Phoenix LiveView, adding interactivity and displaying state changes without reloading the page becomes trivial. The complexity and loss of productivity due to context switching decreases significantly by eliminating the split between the backend and frontend code. But now that the normally stateless, since static, frontend becomes stateful, a new question arises: How can we manage the state?
🔗 The Problem
Once a stateful frontend grows in complexity, it becomes significantly more difficult to keep oversight of how the state is changed, when, by whom, and in what order. Think about state changes caused by asynchronous calls that fetch data from the backend, a websocket connection that pushes new updates to the data, and on top of all of this, have the user edit the state as well. All these actors change the state and since they usually do this directly, it quickly becomes unclear what is happening.
🔗 The Solution
Facebook ran into these issues as their website grew in complexity and proposed an architectural pattern they called flux. If you want to understand this pattern in-depth, we recommend Facebook’s introduction to the topic. In high level terms, the flux pattern wraps every state change into an action with a type and a payload. Every action has to go through a dispatcher, which is similar to a funnel, through which every action has to go sequentially. The dispatcher applies the change to the state using callbacks (sometimes called mutations) which were previously registered by a store to handle certain actions. The stores emit a change event if their state has changed. Special views called controller-views receive that event, fetch the latest state, and apply the updates to their views.
The advantage of the flux pattern is that state changes become observable and replicable. It helps tremendously in debugging breaking state changes and monitoring the information flows of larger frontend applications. It has proven itself to be so useful in sanitizing state changes that every larger single-page application (SPA) framework has an implementation of the flux pattern like Vuex, Redux, and NgRx. In our experiences with LiveView, we ran into the exact issues that these libraries solve and therefore we decided to build a flux implementation for Phoenix LiveView, called LiveEx.
🔗 LiveView meets Flux
In order to facilitate the use of the flux pattern in LiveView, we created the LiveEx library, which helps set up the flux architecture. LiveEx is inspired by the Vuex library, thus it adheres to the following flux flow:
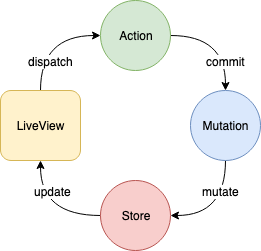
The Vuex flow deviates a bit from the original flux flow since it allows side-effects (e.g. asynchronous or database calls) in its actions. However, everything after the actions must be side-effect free and synchronous. In short, a view dispatches an action, which does its logic and eventually commits a mutation. The mutation actually changes/mutates the state and stores the updated state back in a store. The store notifies the views about its state change, which pull the latest version of the state and update themselves.
LiveEx gives you all the tools to write your own store with actions and mutations and lets you dispatch actions easily from within any LiveView that is connected to a particular store. Subsequently, we show how to get started with the LiveEx library.
🔗 Setup LiveEx
We created an example project that implements LiveEx and open-sourced it on GitHub. Below, we explain how to set up your own project.
Add the LiveEx library to your Phoenix project:
def deps do
  [
    {:live_ex, github: "pjullrich/live_ex" }
  ]
end
Create a module for your store. A fully documented version of an example store can be found on GitHub. Here an example for how it could look like:
defmodule MyAppWeb.Store do
  use LiveEx

  @initial_store %{
    a: 1,
    b: "test",
    c: true,
    d: [nil, nil, nil]
  }

  def init(socket) do
    init(@initial_store, socket)
  end

  # Actions

  def handle_info(%{type: "add"} = action, socket) do
    # Perform any operation with the payload here. For example:
    new_state = socket.assigns.a + action.payload

    commit("set_a", new_state, socket)
  end

  # Mutations

  def set_a(payload, socket) do
    assign(socket, :a, payload)
  end
end
Let’s discuss this. First, store variables can also be added dynamically, but it is a good idea to write out the entire structure of your store once. Thus, define every store variable that you will use in your application with a default value in the initial_store map. Pass this map to the init/2 function together with a LiveView.Socket. This will initialize your store.
Below your init/1 function, define your actions. Use pattern-matching to match the appropriate action with an action type. Perform any business logic in the action, potentially with side-effects or asynchronous calls. Eventually, commit a mutation that updates the state.
Mutations have to be free of side-effects and typically contain little to none business logic except for what is necessary to update the state. Please note that their function name needs to equal the name with which they should be committed (in this case set_a).
Next, connect your store with your “root” LiveView, which is the LiveView that encapsulates any LiveViews that should use the same state.
defmodule MyAppWeb.RootLive do
  alias MyAppWeb.Store

  ...

  def mount(_session, socket) do
    # Init the store
    {:ok, Store.init(socket)}
  end

  ...
  # Delegate any action callbacks to the store
  # Add this line to the end of "root" LiveView
  defdelegate handle_info(msg, socket), to: Store
end
Make sure to pass any state variables down to the nested LiveViews with
<%= Phoenix.LiveView.live_render(
    @socket,
    MyAppWeb.ChildLive,
    session: Map.take(assigns, [:a, :b, :c, :d])
  )
%>
Within every nested LiveView, initialize the store as well in the mount/2 function with the passed-on state variables (here: [:a, :b, :c, :d])
alias MyAppWeb.Store
...
def mount(session, socket) do
  {:ok, Store.init(session, socket)}
end
🔗 Use LiveEx
Display your state in your .leex templates by using the common Phoenix Template syntax:
<h1>Value of "a": <%= @a %></h1>
To change your state, simply call the dispatch/3 function with the type, (optional) payload, and LiveView.Socket and let LiveEx do its magic.
def handle_event("add", value, socket) do
  to_add = String.to_integer(value)
  Store.dispatch("add", to_add, socket)
  {:noreply, socket}
end
The dispatch/3 call will create and commit an action, change the state, and update the state of your LiveView.Socket automagically!
🔗 Debugging
Now that we send every state change through the dispatcher, it becomes trivial to log the state changes. Hence, if you set your Logger to debug, you will see how your actions are changing the state. Here is an example from the console:
[debug] LiveEx
      - Action:  add
      - Payload: 3
      - Before:  %{a: 2, b: "test", c: true, d: [nil, nil, nil]
      - After:   %{a: 5, b: "test", c: true, d: [nil, nil, nil]
🔗 Conclusion
LiveEx will hopefully help you to develop middle to larger frontends. It is not yet battle-tested, nor optimized. It will change dramatically once the LiveView team implements support for prepending and appending data since then each store state can be kept in a dedicated socket assignment. More on this here.
If you want to help to make state management with LiveView easier, your help and feedback are most welcome and best handed in on the LiveEx GitHub page.
For further information, please check out the LiveEx Example Repository.