Build dynamic Forms with JSON Schemas
Hey folks, before we begin:
Where do dads store their jokes?

In the dad-a-base
Alright 😄 Let's get started with today's topic: How to build dynamic forms with JSON schemas
Why JSON Schemas
As I wrote in my book, probably 50% of a software engineer's time is spent building tables. The other 50% is spent on building forms. This article covers how to build forms faster.
Imagine that you have to build a signup form. Usually, you only need a username and password field. But what if that signup form needs to be different for every country in which your company operates? You might need to capture country-specific personal details, like a social security number or national insurance number.
In this case, you probably don't want to create and maintain every form by hand. Instead, wouldn't it be nice to have a simple file where you could specify the fields needed per country? A file that your frontend simply takes and renders?
That's exactly where JSON Schemas come in. You can define your fields as JSON, render them as an HTML form, and automatically validate user responses. Let's see how to use them with Phoenix LiveView.
Add a JSON Renderer
Before we define our JSON Schema, let's add a library that renders our form as HTML. There are plenty out there. I'll use the JSONEditor, not because it's the best (it isn't), but because it's written in vanilla JS and doesn't require a frontend framework like React.
Simply copy the production version and paste it into a file at assets/vendor/jsoneditor.js. That's it!
Now, let's add some HTML and JS code to render our form. Create a .heex template that renders only the form:
<div>
  <div id="json-schema-form" phx-hook="JSONSchemaForm" />
  <button
    id="json-schema-form-submit"
    type="submit"
  >
    Save
  </button>
</div>
The HTML template defines a placeholder div #json-schema-form which we'll use to render the form. It also defines a button to submit the form. We'll capture the form submission in JavaScript before sending it off to LiveView, so we don't use a Phoenix Form here. If you're worried about CSRF attacks on this form, don't fear because we'll submit the form through our LiveView Websocket which protects against such attacks automatically. Even LiveView doesn't render CSRF tokens for LiveView-only forms anymore, but only for forms that submit over HTTP.
Now that we've defined our HTML template, let's add some JavaScript to create our form. Add the following to e.g. assets/js/hooks/json_schema_form.js:
import { JSONEditor } from "../../vendor/jsoneditor";
JSONEditor.defaults.options.theme = "tailwind";

export default {
  mounted() {
    this.pushEvent("load-schema", { code: "GER" }, (reply, ref) => {
      const editor = new JSONEditor(this.el, {
        schema: reply.schema,
        disable_collapse: true,
        disable_edit_json: true,
        disable_properties: true,
        no_additional_properties: true,
      });

      document
        .getElementById("json-schema-form-submit")
        .addEventListener("click", () => {
          const errors = editor.validate();
          if (errors.length) {
            editor.setOption("show_errors", "always");
          } else {
            editor.setOption("show_errors", "interaction");
            this.pushEvent("submit", editor.getValue());
          }
        });
    });
  },
};
The JS code above defines a Phoenix Hook that creates a new JSONEditor instance for building and validating our form. Once the hook mounts, it first fetches the form schema for Germany, which we hard-coded for now, and waits for a reply (Thank you to my dear colleague Svilen who explained the pushEvent -> reply mechanism on StackOverflow). When the reply arrives, the hook creates a new JSONEditor instance that renders the schema in the placeholder div on which we set the phx-hook=JSONSchemaForm hook.
The second part of our hook handles the form submission. We intercept the form submission using an EventListener on the submit button. First, we validate the input against our JSON schema. If no errors exist, we send the data to the LiveView. Otherwise, we show the error messages on the form.
Note that we set the JSONEditor theme to tailwind. This will style our form using TailwindCSS utility classes. But if you start our server, you'll see that these classes have no effect. That's because Tailwind purges any unused classes by default and doesn't know that the JSONEditor uses these classes. You can easily tell Tailwind not to purge the classes used by the JSONEditor in your tailwind.config.js like this:
content: [
    "./vendor/*.js", // <- Add this line
    "./js/**/*.js",
    "../lib/*_web.ex",
    "../lib/*_web/**/*.*ex",
  ],
Now, Tailwind won't purge the classes used by the JSONEditor and our form should stay styled.
As a last step, we need to add the new hook to our LiveView. Add the following to your assets/js/app.js:
import JSONSchemaForm from "./hooks/json_schema_form";

let Hooks = {};
Hooks.JSONSchemaForm = JSONSchemaForm;

let liveSocket = new LiveSocket("/live", Socket, {
  params: { _csrf_token: csrfToken },
  hooks: Hooks // <- Add this
});
Now, all our frontend code is in place. Let's set up the LiveView next.
Add a JSON Schema
Our LiveView needs to do two things: Serve the JSON schema and validate form submissions. Let's start with the first part.
We already request the schema from our Phoenix Hook using the this.pushEvent("load-schema", ...) call. So, our LiveView needs an event handler that returns the schema for a given country code. Here's how:
defmodule DemoWeb.FormLive do
  use DemoWeb, :live_view

  def handle_event("load-schema", %{"code" => code}, socket) do
    {:reply, %{schema: schema(code)}, socket}
  end

  defp schema("GER") do
  # You'd probably load the schema from either your database
  # or a JSON file, but we'll simply hard-code it for now:
    %{
      "type" => "object",
      "title" => "Person",
      "properties" => %{
        "name" => %{
          "type" => "string",
          "title" => "Name",
          "minLength" => 3,
          "propertyOrder" => 0
        },
        "salary" => %{
          "title" => "Your Salary Expecations",
          "type" => "integer",
          "minimum" => 0,
          "maximum" => 1_000_000,
          "propertyOrder" => 1
        },
        "dob" => %{
          "type" => "string",
          "format" => "date",
          "title" => "Your Birthdate",
          "propertyOrder" => 2
        },
        "citizen" => %{
          "type" => "boolean",
          "format" => "checkbox",
          "title" => "Are you a Citizen of the country?",
          "propertyOrder" => 3
        }
      },
      "required" => ["name", "salary", "dob"]
    }
  end
end
Our LiveView fetches a JSON schema as a map and returns it using the :reply response. The this.pushEvent and :reply combination allows us to make a sync call from our client hook to the LiveView. I just wanted to showcase this behaviour, but usually you'd make an async request with this.pushEvent and this.handleEvent to fetch the schema. The downside of a sync call is that it blocks the frontend until the schema is fetched. An async request allows the page to fully load even before the schema is returned, which is a better UX.
If you look at the schema that we return, you see that we define four fields here. A name, salary expectation, date of birth, and citizenship. Each field has its own requirement which we'll validate later. I advise you to read the official documentation for JSON Schemas if you want to learn how to define properties. Let's see how the JSONEditor renders the schema:
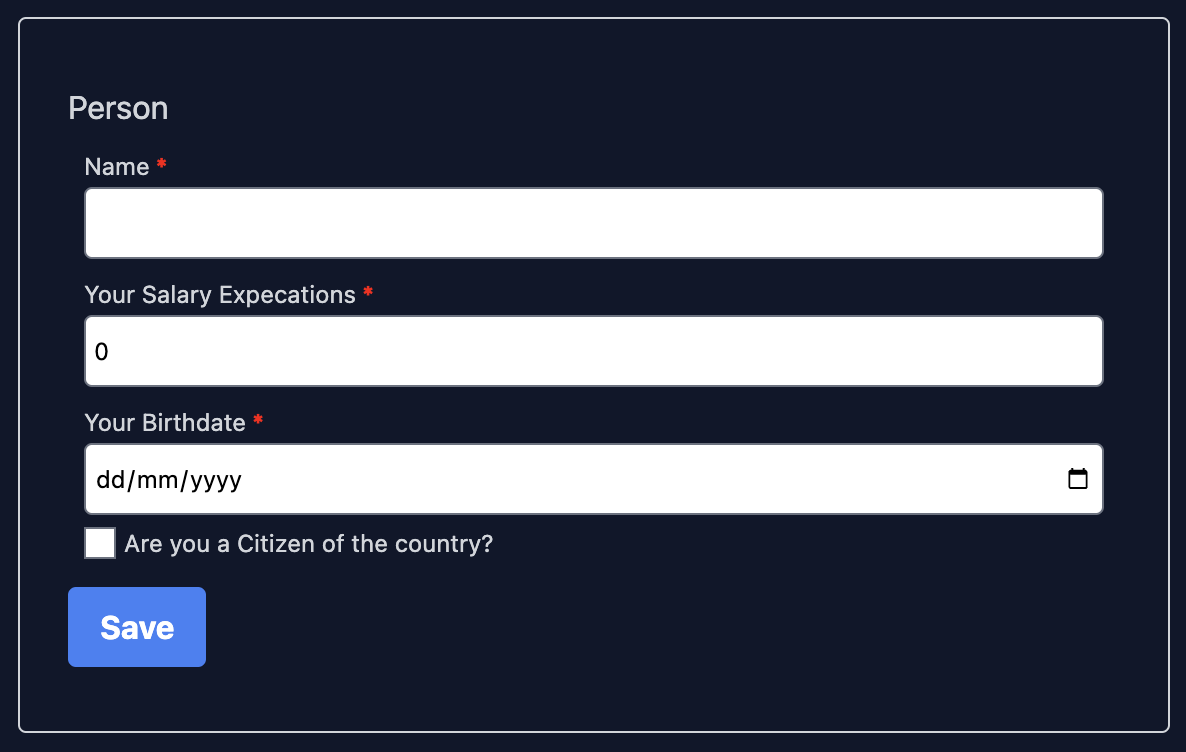
Looking good already! Now to the second part: The validation.
When a user submits the form, the JSONEditor library validates the submission and shows any errors right there in the form. The user knows immediately which fields are wrong. Let's see how it looks like if the user submits invalid data:
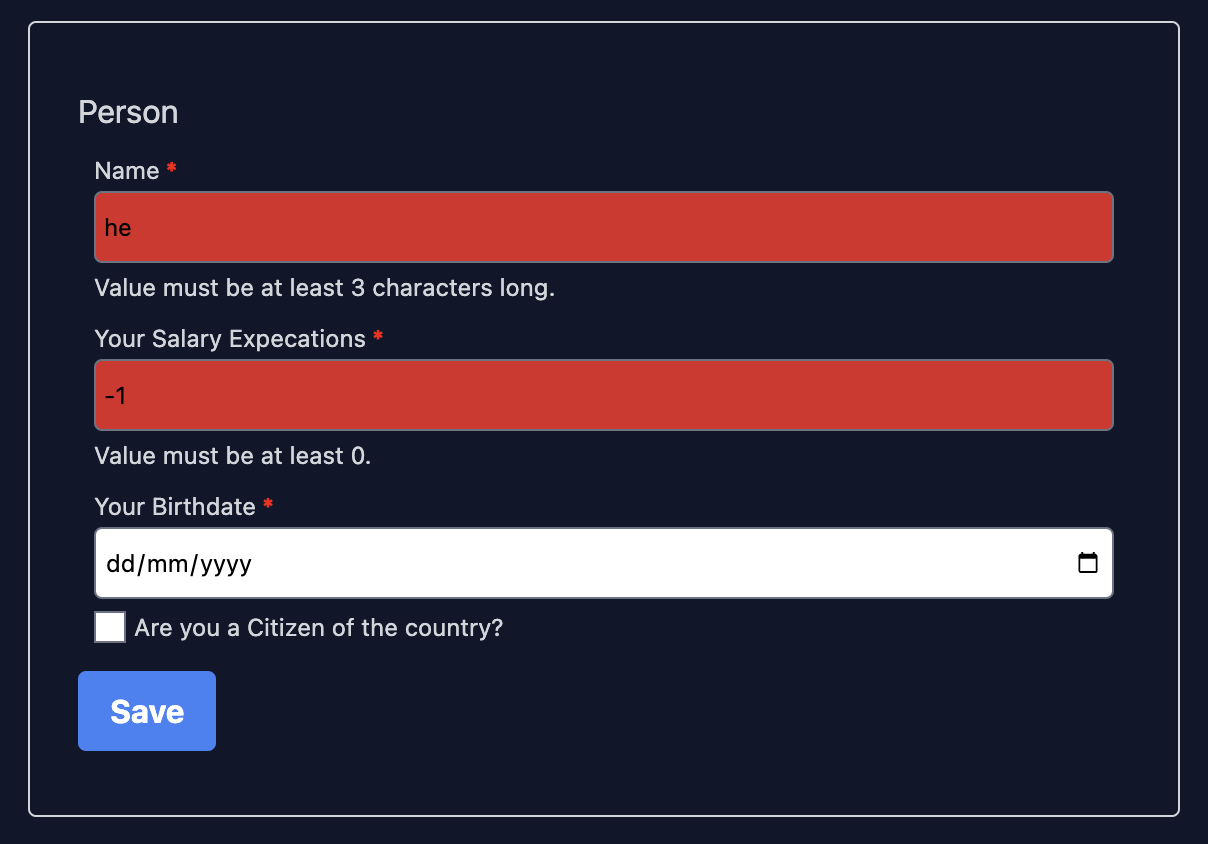
Now, the user knows which fields to fix. Once the entered data is valid, the JSONEditor will send the data to the LiveView. Here, we need to validate the submission again, because we should never rely on client-side validation only. It's too easy to circumvent the client-side validation and submit corrupted data to the backend. We'll use the ExJsonSchema library to validate the submitted data in our LiveView. Let's have a look:
defmodule DemoWeb.FormLive do
  use DemoWeb, :live_view

  def mount(_params, _session, socket) do
    ref_schema = ExJsonSchema.Schema.resolve(schema())

    {:ok, assign(socket, :ref_schema, ref_schema)}
  end

  def handle_event("submit", params, socket) do
    ref_schema = socket.assigns.ref_schema

    case ExJsonSchema.Validator.validate(ref_schema, params) do
      :ok ->
        {:noreply, put_flash(socket, :info, "Success!")}

      {:error, _errors} ->
        {:noreply, put_flash(socket, :error, "Errors!")}
    end
  end

  # handle_event("load-schema"...)
  # defp load_schema(...)

end
When the JSONEditor library sends the data to the LiveView, we handle it in the "submit"-handler. To validate the submitted data, we need the schema as a reference. That's why we first resolve and assign the schema in our mount/3 callback. This simply translates the schema into a struct that the ExJsonSchema library understands.
In our event handler, we call the ExJsonSchema library with the data and the reference schema. It returns either :ok if the data is valid or {:error, errors} if not. Unfortunately, it's quite complex to show these errors below the invalid fields in the form unless we send an event to the JS hook and somehow inform the JSONEditor that there were errors. That's why we simply display an error message here. Luckily, the ExJsonSchema library "should" never return an error because the JSONEditor already validated the data. If you run into an error here, either the frontend library didn't do a good job at validating the input, or something funky happened.
And that's it! We successfully rendered a form based on a JSON schema and validated the submission. Great job!
Caveats
If you decide to implement this in your application, be aware of these caveats:
We load the JSONEditor code into our app.js bundle, but that means that the JS code is loaded on every page. That's not necessary, so when you implement it, rather load the editor only when needed with dynamic imports. See more here.
I used the JSONEditor library because it was easy to set up, but it isn't the most reliable. The client-side validation isn't perfect (e.g. dates can be empty although they are required) and it comes with a lot of things we don't need (e.g. to edit your submission in JSON format). For a production application, I would rather opt for a React-based library like Formik or Formio.
I styled the form using the Tailwind theme of the JSONEditor because it was quick and easy. However, this gives me no control over the style and I can't edit it. If you implement it, you better style the form inputs yourself. Otherwise, it's impossible to change e.g. the text color or input background.
You might have noticed that the properties in our JSON schema have a type and a format option. The type option defines in which format (smart!) the input is transmitted. The format defines how the property is displayed. So, a date format will still have a string type, because it's sent as a string to the backend although you entered it as a date string (e.g. 2022-12-31). Not all libraries support all types and all formats. Before choosing a client-side and backend library, better check the supported types and formats and test them in an example application.
Conclusion
And that's it! I hope you enjoyed this article! If you have questions or comments, let's discuss them on BlueSky. Follow me on BlueSky or subscribe to my newsletter below if you want to get notified when I publish the next blog post. Until the next time! Cheerio 👋