Sending text messages from a Raspberry Pi with Nerves
I recently got to play around with a Raspberry Pi Zero W and a Waveshare GSM/GPRS/GNSS Hat, a relatively low-cost module (~30USD) for sending text messages, making phone calls, using mobile internet, and tracking your geolocation. In the following, I will walk you through how to set up the hardware and create a simple project for sending out text messages using Nerves and Elixir.
The Hardware Setup
You need the following hardware components:
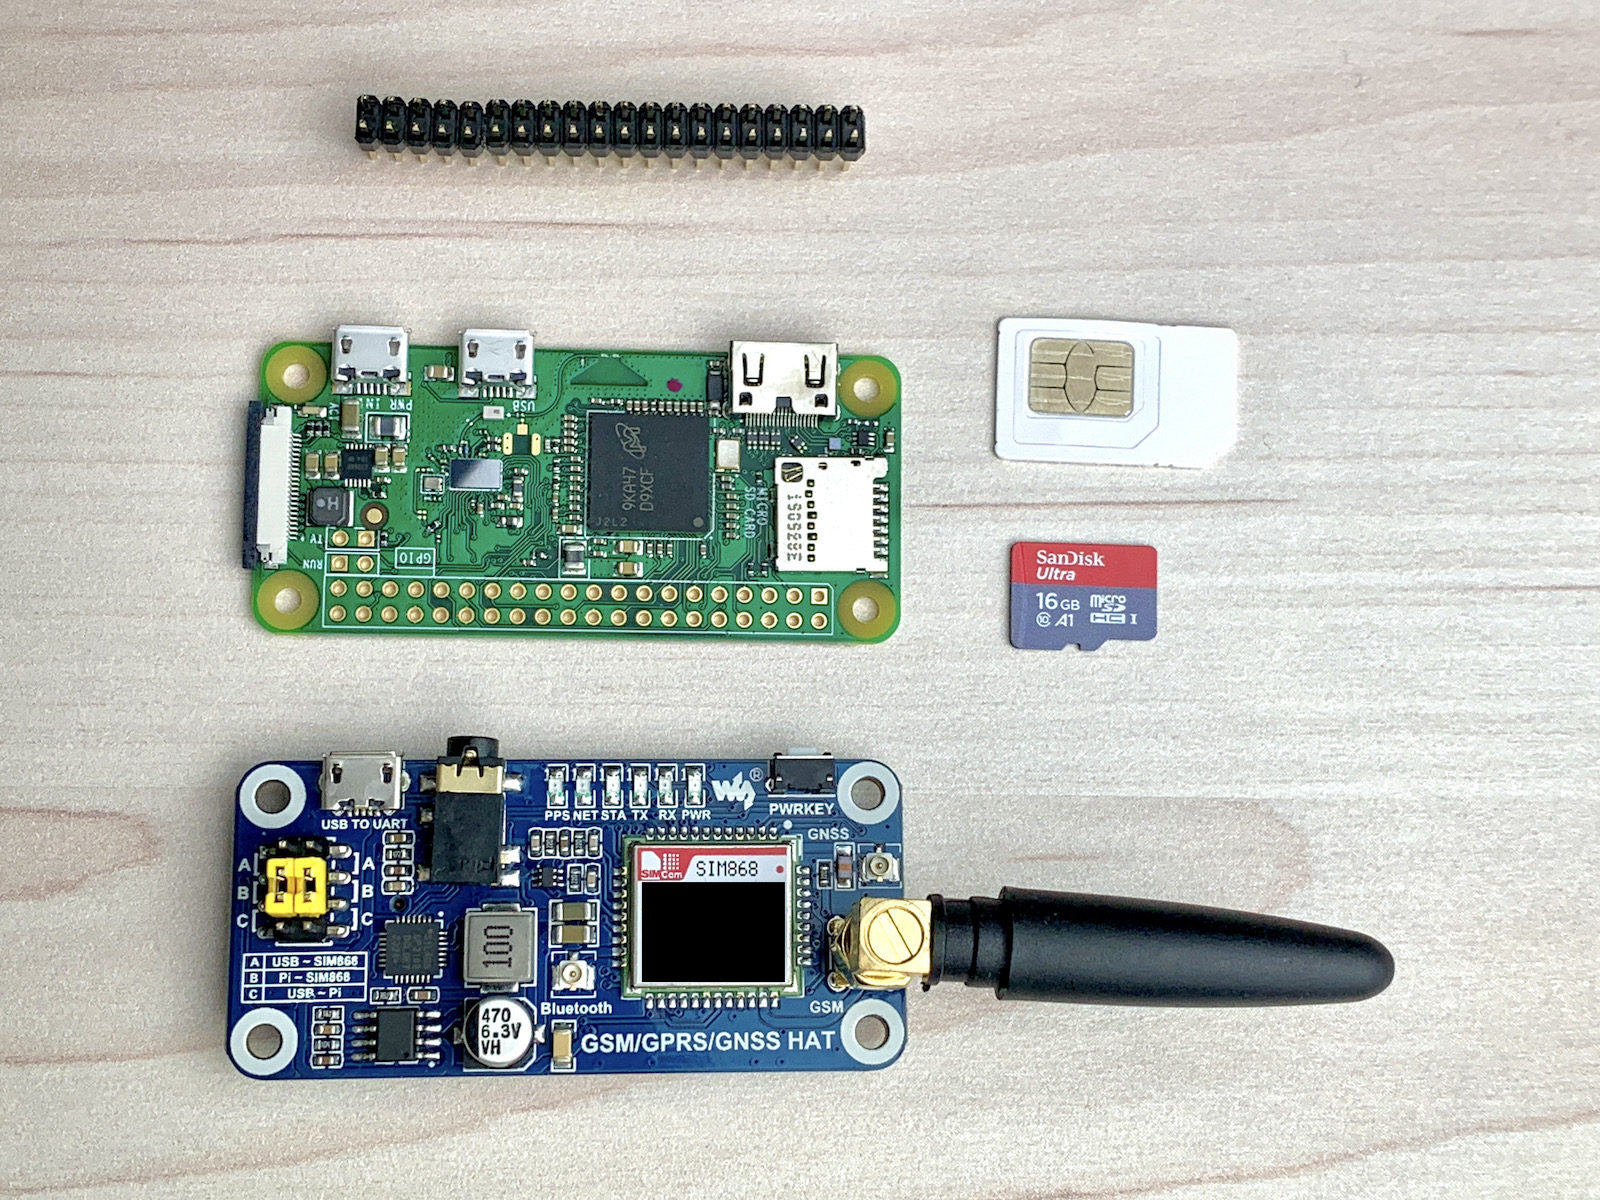
- A Raspberry Pi. I use the Raspberry Pi Zero W, which has a direct USB connection to your laptop, which you can use to upload your software and connect via SSH. Other Raspberry Pis like the
3b+don't have that USB connection and require access to a shared WiFi network. You don't necessarily need a Raspberry Pi, but any of the supported targets will work. - A Waveshare GSM/GPRS/GNSS Hat. I bought this module since I didn't know better and it works perfectly fine. However, now I would recommend buying a GSM module which uses one of the modems supported by the VintageNetMobile library. This library makes using mobile internet seamless, but only supports a few modems as of now. The Waveshare Hat uses the
SIM868modem, which isn't supported by theVintageNetMobilelibrary and therefore requires more work to set up a mobile internet connection. - An activated SIM Card. Make sure that the SIM card is activated and isn't locked by a PIN. You can test this by plugging the SIM card into your phone. If you can make phone calls without having to enter a PIN beforehand, the SIM card is probably activated.
- A microSD card. The size of the bundled version of your project together with the Nerves software will be around
36mb. Therefore, microSD cards of any size (8GBor up) should work. - A 40 PIN GPIO Header. These 40 Pins will connect the Waveshare Hat to the Raspberry Pi.
Installing the SIM Card
I struggled with this a bit (because I didn't read the manual), so let me explain how you install the SIM card on the Waveshare Hat.

You first need to slide down the SIM card tray towards the battery holder. The tray has "Open" and "Closed" markings, which indicate in which direction you need to slide the tray. After you opened the tray, put in the SIM card, preferably in the largest SIM card plastic holding form in which it came. Otherwise, your SIM card might move around and lose connection to the Waveshare Hat. Close the tray and slide the tray into the "Closed" direction.
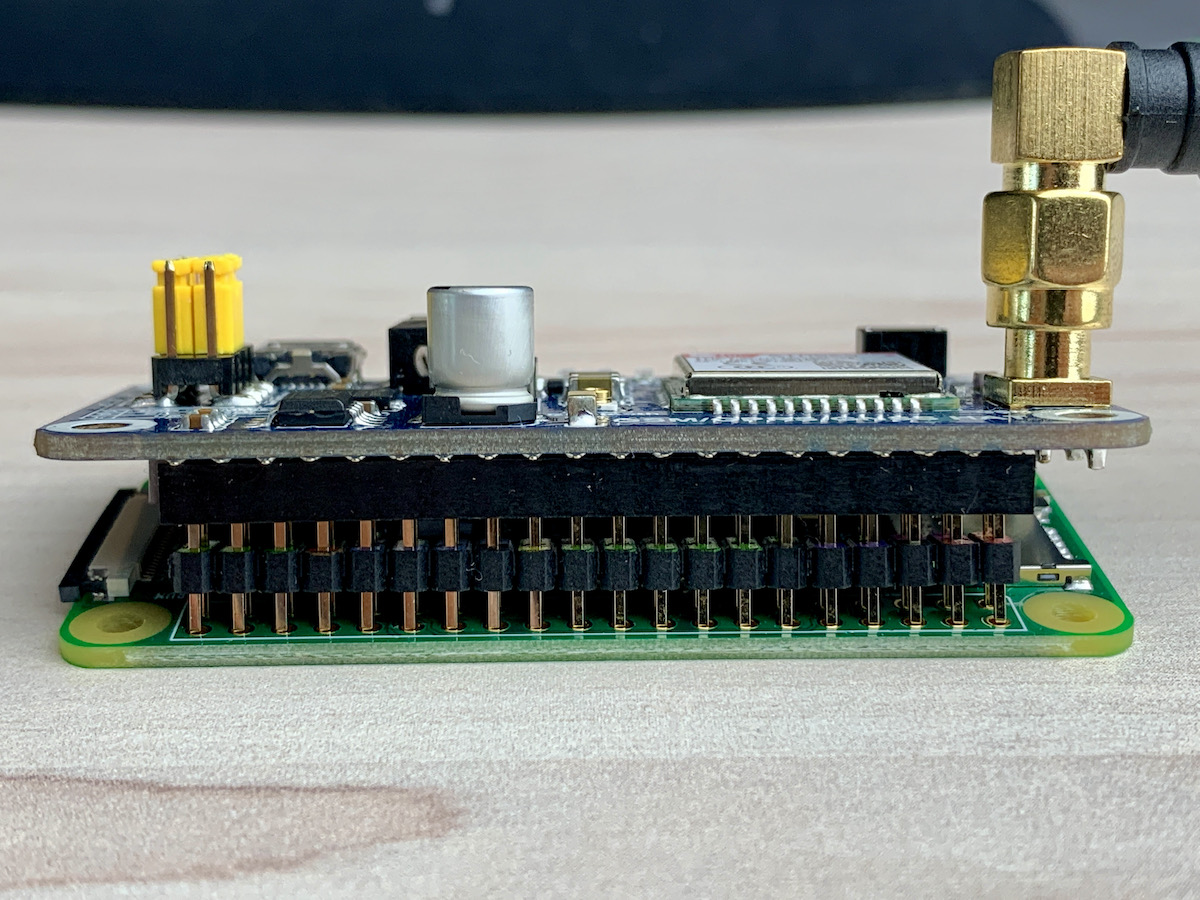
Connecting the Waveshare Hat with the Raspberry Pi
Use the 40 PIN GPIO Header to connect the Waveshare Hat with the Raspberry Pi. I stuck the long end of the pins into the Waveshare hat and the short ones into the Raspberry Pi. This way, it is easier to solder the pins onto the Raspberry Pi, and the Waveshare Hat has a good distance to the Raspberry Pi.
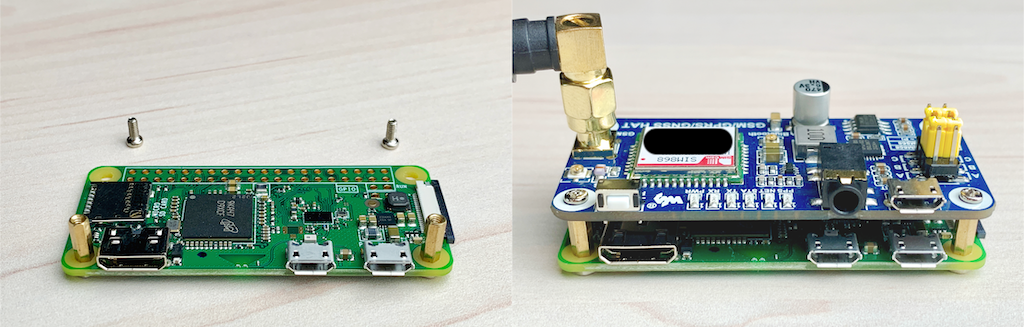
Optional: Securing the Waveshare Hat with the frame pins
If you want, you can use the 2 pins which come with the Waveshare Hat to connect the 2 frontal edges of the Waveshare Hat and the Raspberry Pi. This gives the entire construction a certain sturdiness.
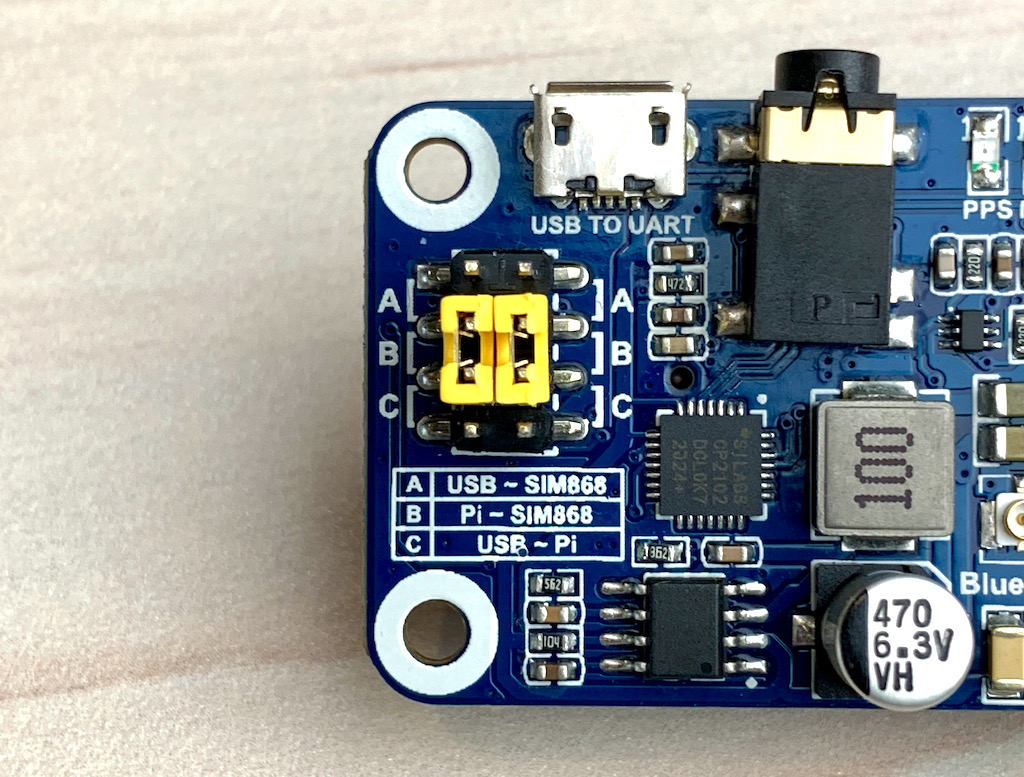
Setting the Jumper
It is important to set the two yellow jumpers on the Waveshare Hat to the B position. Otherwise, you will not be able to communicate with the Waveshare Hat from your Raspberry Pi.
And that's it! You now have connected the Waveshare Hat successfully to your Raspberry Pi.
The Software Setup
Let's first create a new Nerves project and burn it to the microSD card. Make sure that you have Nerves and all necessary dependencies installed on your computer. Next, open a folder of your choice and run:
mix nerves.new texting
This will create a new Nerves project for you. Next, set the Target of your project. In our case, this will be the Raspberry Pi Zero. You can set the target in multiple ways:
# Set the target for the entire shell session
export MIX_TARGET=rpi0

# Set the target per call, e.g.
MIX_TARGET=rpi0 mix firmware

# My preference
# Set the target in your .env.
# Don't forget to restart your shell session.
MIX_TARGET=rpi0
If you are using a different Raspberry Pi than me, you need to change the target accordingly to e.g. rpi2, rpi3, or rpi4.
Add the following dependencies to your mix.exs:
# mix.exs

defp deps do
  [
    {:waveshare_hat, "~> 0.1.0",
      github: "PJUllrich/nerves_waveshare_868_gsm_gprs_gnss_hat"}
  ]
end
Let's fetch the dependencies and build our example project. Warning: The next step will download ~175Mb of data. If you are on a limited data plan, consider running this command later or downloading the nerves_system_rpi0-portable-*-file from GitHub manually.
cd texting
mix deps.get
mix firmware
This will take a while (up to 2min on my machine). Enough time to check BlueSky.
Connecting to the Raspberry Pi
After your project was built successfully, stick your microSD Card into your computer and run the command:
mix firmware.burn
This command will build an OTP release for your project and copy everything to your microSD card. It tries to find the microSD card automatically. You should see the following prompt or something similar:
Use 14.84 GiB memory card found at /dev/rdisk2? [Yn] y
You can now eject your microSD card and put it into the Raspberry Pi. Connect your Raspberry Pi Zero to your computer by inserting a Micro-USB cable in the USB-Port of your Raspberry Pi Zero. If you have a different Raspberry Pi, you probably need to connect it to your local WiFi using VintageNetWifi.
If not using a Raspberry Pi Zero: Add the following dependency and configuration and run the mix do deps.get, firmware, firmware.burn:
# mix.exs
def deps do
  [
    {:vintage_net_wifi, "~> 0.9.0", targets: @all_targets}
    ...
  ]
end

# config/config.exs
config :vintage_net,
  config: [
    {"wlan0",
      %{
        type: VintageNetWiFi,
        vintage_net_wifi: %{
          networks: [
            %{
              key_mgmt: :wpa_psk,
              ssid: "my_network_ssid",
              psk: "a_passphrase_or_psk",
            }
          ]
        },
        ipv4: %{method: :dhcp},
      }
    }
  ]
Make sure to enter the correct Network SSID and Network Password so that your Raspberry Pi connects to the WiFi automatically. You should then be able to find it on your local network.
Make sure that your Raspberry Pi is plugged in. You can now connect to your Raspberry with:
ssh nerves.local
Pushing changes to the Raspberry Pi
If you make changes to your project and want to push it to the Raspberry Pi, you first need to run the following command:
mix firmware.gen.script
This will create an upload.sh script, which handles uploading the latest version of your project onto the Raspberry Pi. It loads the new release to the B partition of the Nerves file system and starts up the new version. Only if the new version was booted successfully, it switches over from the A partition to the new version. Pretty cool, he?
Anyways, upload a new version of your project to the Raspberry Pi with:
mix firmware
./upload.sh
It will take a few seconds until the Raspberry Pi rebooted. Afterward, connect with ssh nerves.local, and you should have the latest version available!
Sending a text message
Before we can communicate with the Waveshare Hat, you need to power it up.
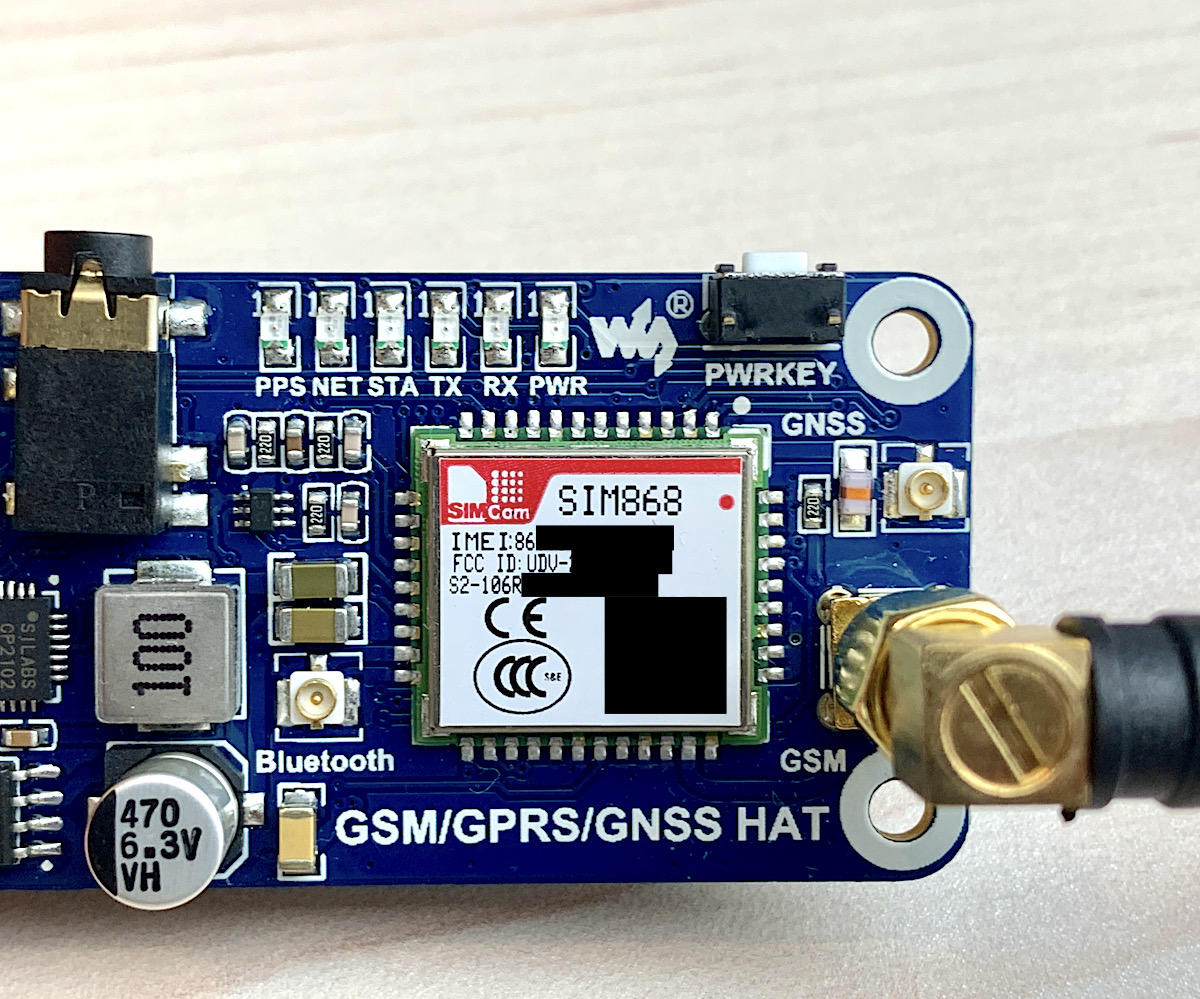
Press and hold the PWRKEY-Button for 3-5 seconds until you see that the STA LED glows continuously and the NET LED flickers quickly. Once the NET LED flickers slowly, the Waveshare Hat established a connection with the mobile network and is ready to receive our commands.
Establishing a connection
First, we need to find the USB-based serial port through which we can open a connection to the Waveshare Hat. The names of the serial ports typically start with tty, and you can show all available serial ports with the command:
iex(1)> Circuits.UART.enumerate
%{"ttyAMA0" => %{}, "ttyS0" => %{}}
Usually, the enumerate/0 function would show connected devices, but for some reason, the Waveshare Hat does not show up in this list. Nevertheless, you can still connect it through the, in my case, ttyAMA0-port. So, let's do that with the command:
{:ok, pid} = WaveshareHat.connect("/dev/ttyAMA0")
You can check the status of the Waveshare hat with:
iex(17)> WaveshareHat.status(pid)
:ok
iex(18)> flush
{:circuits_uart, "/dev/ttyAMA0", "AT\r"}
{:circuits_uart, "/dev/ttyAMA0", "OK"}
:ok
And check the status of your SIM card:
iex(19)> WaveshareHat.status_sim(pid)
:ok
iex(20)> flush
{:circuits_uart, "/dev/ttyAMA0", "AT+CPIN?\r"}
{:circuits_uart, "/dev/ttyAMA0", "+CPIN: READY"}
{:circuits_uart, "/dev/ttyAMA0", ""}
{:circuits_uart, "/dev/ttyAMA0", "OK"}
:ok
Sending a text message
Now, we can communicate with the Waveshare Hat and everything is connected. Let's finally send that text message!
Execute the following commands. The receiver should receive your text message! Exciting, no?
WaveshareHat.SMS.set_local_number(pid, "YOUR_NUMBER")
WaveshareHat.SMS.set_receiver(pid, "THE_RECEIVING_NUMBER")
WaveshareHat.SMS.set_sms_body(pid, "Hello World from the Raspberry Pi!")
WaveshareHat.end_mark(pid)
The Waveshare Hat echos all commands back to you. With this, you can check whether all commands from above were received successfully.
iex> flush
{:circuits_uart, "/dev/ttyAMA0", "AT+CSCA=\"YOUR_NUMBER\"\r"}
{:circuits_uart, "/dev/ttyAMA0", "OK"}
{:circuits_uart, "/dev/ttyAMA0", "AT+CMGS=\"THE_RECEIVING_NUMBER\"\r"}
{:circuits_uart, "/dev/ttyAMA0", "> Hello World from the Raspberry Pi!"}
{:circuits_uart, "/dev/ttyAMA0", "> "}
{:circuits_uart, "/dev/ttyAMA0", "+CMGS: 1"}
{:circuits_uart, "/dev/ttyAMA0", ""}
{:circuits_uart, "/dev/ttyAMA0", "OK"}
Conclusion
And that is it! I hope that you enjoyed this tutorial! We learned how to run a Nerves project on a Raspberry Pi, how to connect to the Waveshare GSM/GPRS/GNSS Hat, and how to send text messages using it. In upcoming blog posts, I will look more into how to make phone calls and how to track your geolocation with the Waveshare Hat, so consider following me on BlueSky to stay updated.